I may have been the only foodie in my elementary school. Probably because my mother put canned olives and marinated artichoke hearts in my hand-knitted Christmas stocking with my name spelled incorrectly on it (a gift from my uncle), instead of candy.
By the time I was 10, I was trimming and picking carrots, strawberries, and spinach in my own little garden. I decided what to plant, when to plant it, and how to tend it. My mom taught me how to can, jam, and make bread. In spite of growing up in the Midwest (known for its exciting meat and potatoes cuisine), my mother always pushed me to try new and unusual foods at a young age, like liver and gizzards, lamb, and beets. At age 16 my favorite foods were salads of all kinds and spaghetti with bottarga—salted, cured fish roe.
Before starting my cooking career in 2011, I studied nutrition beginning at the age of 16. I practiced as a chiropractor, acupuncturist, and nutritionist for eight years and focused on food as a way to heal people. I also taught cooking classes and practiced many different healthy eating techniques. This led to my passion for vegetables, seafood, and grains that you’ll see in my menus.
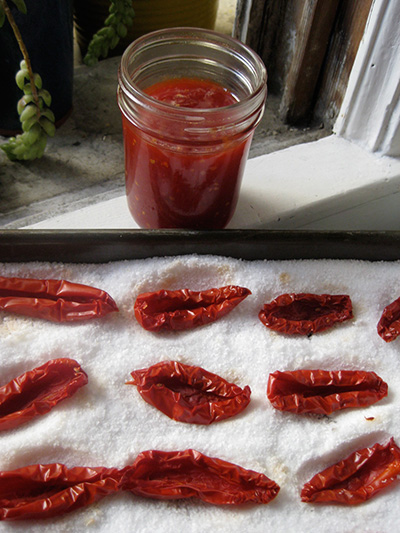
Canning season is my favorite time of year. I especially love canning tomatoes because they are a pain in the ass, and really teach you a new level of patience for the best things in life. I thought I was going to miss it this year because I was living in Spain, while California’s tomatoes were basking in the summer sunshine. But this was a great year for tomatoes, and November saw me canning and drying the season’s last batch of farm-direct tomatoes.
Here’s a borrowed recipe for tomato jam. It’s an homage to my mother’s jamming obsession that we now share.
Tomato Jam
Recipe from Rachel Saunders, author of The Blue Chair Jam Cookbook (Andrews McMeel Publishing, 2010)
 ingredients:
• 9 lbs medium sweet tomatoes, such as Early Girl
• 3 lbs. 15 oz. white cane sugar
• 1 small blade of mace
• 2 small pinches of salt
preaparation:
- Put five metal teaspoons in a saucer and place in a flat area in your freezer for testing the jam later. Bring a medium kettle of water to a boil, then carefully drop the tomatoes into the water to loosen their skins. Leave the tomatoes immersed for 1 minute, then drain them in a large colander. When they are cool enough to handle, peel them over a large heatproof mixing bowl, discarding the skins. Place a cutting board on a rimmed baking sheet and chop the tomatoes into medium pieces. Transfer the tomatoes and their juices back into the mixing bowl. Add the sugar and lemon juice, stirring well to combine. Transfer the mixture to an 11- or 12-quart copper preserving pan or wide nonreactive kettle. Place the mace into a fine-mesh stainless-steel tea infuser with a firm latch and add it to the mixture.
- Bring the jam mixture to a boil over high heat. Add the salt and decrease the heat slightly. Skim off any surface foam with a large stainless-steel spoon. Continue to cook, monitoring the heat closely, until the jam thickens and no longer seems watery, 30-45 minutes. Scrape the bottom of the pan often with a heatproof rubber spatula, and decrease the heat gradually as more and more moisture cooks out of the jam. For the final 15-20 minutes of cooking, or when the jam starts to visibly thicken, stir the jam gently and constantly to prevent burning.
- To test the jam for doneness, carefully transfer a small representative half-spoonful to one of your frozen spoons. Replace the spoon in the freezer for 3 to 4 minutes, then remove and carefully feel the underside of the spoon. It should be neither warm nor cold. If still warm, return it to the freezer for a moment. Nudge the jam gently with your finger; if it seems thickened and gloppy when you nudge it, it is either done or nearly done. Tilt the spoon vertically to see how quickly the jam runs; if it runs very slowly, and if it has thickened to a cohesive consistency, it is done. If it runs very quickly or appears watery, cook it for another few minutes, stirring, and test again as needed.
- When the jam is ready, remove the mesh tea infuser. Skim any remaining foam from the surface of the jam. Pour the jam into sterilized jars and process according to the manufacturer’s instructions.